How do I connect a chosen leader to my fly line, do I form a loop, use a line pin or nail knot?... here is a selection of the connections you may want to consider or perhaps avoid in order to attach that all important link between your fly line and fly.
What can we hope for from such a leader connection...
- ...one that can be applied so as to be either permanent or temporary as we see fit
- ...for it to remain as secure as intended when pulled against the fly line to which it is attached
- ...that it shall not hinder the transfer of energy between fly line and leader upon that it connects

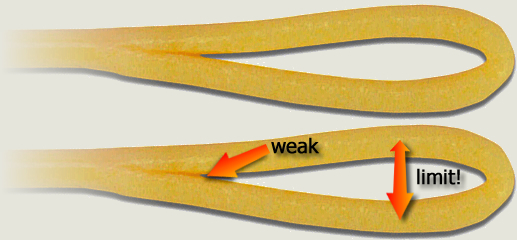 The Welded Loop - Applied at source these are now common place amongst manufacturers. The most appropriate leader connection therefore being loop-to-loop, attaching your leader with anything that so much as resembles a blood knot or similar would only but damage the coating and potentially over time expose the core through repetition of such application ... cheese wire through cheese comes to mind. Take care also when opening the loop during application as the seam is where the parting of the ways first starts to occur... from then on it's only a matter of time before the loop is no more!
These welded loops are an ideal starting point. It is important however to learn an alternative so you have a 'fix method' as and when this loop fails... because they generally do!.
If you'd like to know more about making your own Welded Loop, I could do no better than direct you here to Lee Cummings and his excellent tutorial.
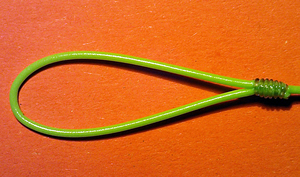
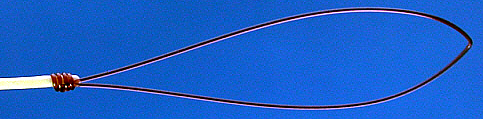
Fly Line Loop (Braided & Mono Cores) - Not all manufactured lines have the luxury of a welded loop, perhaps over time yours has deteriorated or you've removed it.
This alternative is simple yet strong and is formed by merely folding the line at the tip and securing.
 I fold the fly line and establish loop size.
- Using knot pipe tool (C&F), I apply a nail knot with 6-7 turns of monofilament.
- Ensuring the knot is pulled snug & tight, I trim the fly line tag at a slight angle.
I avoid touching turns for the wraps if possible, leaving tiny gaps so each pinches the line 'on' and 'between' making for the strongest of non-slip holds.
- I complete by coating the wraps with UV knot sense for a secure & smooth finish.
The key to using the correct nylon is its diameter. It needs to be thick enough so as not to need copious amounts of turns to secure the loop, but thin enough to bite into the fly line coating thus holding everything firm and tight. I personally use Chod Filament at 0.43mm, it is stiff and retains memory which I find although used in only small amounts is very effective.
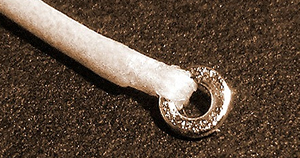
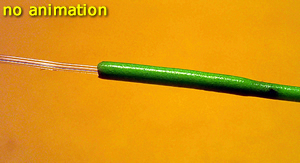
Fly Line Core Loop (Braided Cores) - For those preferring a fly line core loop connection of sorts and although sometimes quite tricky to produce, this is probably the most popular choice. What follows is but one way of the many techniques there are to achieve it. The exposed fly line core can be quite limp as a result and if formed correctly produces a very neat loop with excellent energy transfer capabilities.
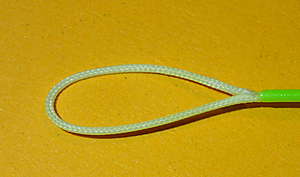
 Using 14lb mono, I strip approx 50mm of the fly line coating using a figure of 8 knot.
- With my needle I fray about 10mm of the core, split into 2 and cut away one half. This removes bulk and makes working the core through the fly line much easier.
- I thread the remainder of the frayed fibres into a small sewing needle (0.85mm diam'). Then insert the needle into the core a few millimetres short of the coating. I push the needle through the cores centre and into the fly line for circa 10mm before pushing the needle through the side and out of the fly line.
- Now I pull through the exposed core closing the loop to the desired size.
- I put a tiny drop of low viscose waterproof super glue where the tag exits the line and at the loop seam to both secure and seal the core, then trim the remaining tag with a sharp blade flush* with the fly line.
- I will then finish off by coating the loop seam with polyurethane (Aquasure) for lines up to #4.
- For lines #5 and above I'll nail knot with mono at the seam and coat with UV knot sense similar to the aforementioned fly line loop. The nail knots purpose here is to further strengthen the structure of the seam by way of compression so I prefer touching turns as opposed to the open pinch turns as with the fly line loop above.
* Having trimmed the tag slightly proud of the fly line and before applying the super glue to the loop seam, you can pull slightly on the loop to further hide any visible sign of the tag rather than trim it flush.
 Gray's Leader Loop (Braided & Mono Cores) - John at Grays of Kilsyth makes his loops from mono rather than use the line or core. Not wishing to just replicate his detailed tutorial here is a link to the relevant section of his website for you to view.

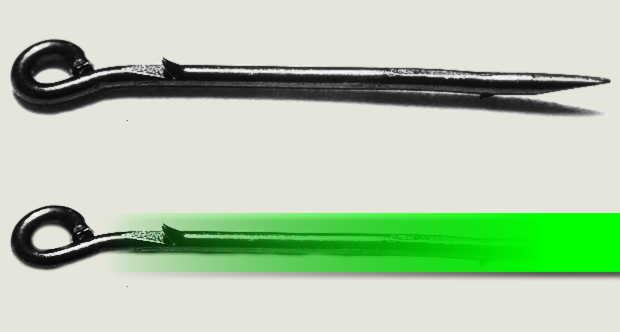 Line Pin (Braided Cores) - 14 to 15mm in length, a rounded eye for leader attachment, a sharp point at the opposite end, 1 barb top & bottom and at either end of the shank, you push it into the core of your fly line then pull slightly thus forcing the barbs into the cores material.
The hold is firm and there is no particular weak point within the pin itself, more is the question as to how much damage could be done to the fly line at the point of insertion with constant use.
As for any modicum of flexibility that would otherwise compliment the fly line in any way, shape or form... there just isn't any.
I struggle to see any merits in using these above many alternatives described within this article.
 Fly Line Tip Ring (Braided Cores) - I devised this application for short line nymphing when there was little or no need for a tapered leader, perhaps Czech nymphing and a like. Quite complex it certainly falls into the permanent category and benefits from pretty much any knot application you care to favour.
I first shared it on my blog here some time ago... see the pdf version here for easy viewing.
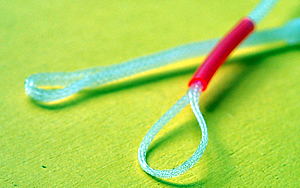
 Braided Loop (Braided & Mono Cores) - Prior to the welded loop innovation this type of application was by far the most popular, and probably still is amongst many. Especially stillwater & salmon anglers who on occasions like to apply poly leaders of varying densities to fish locations with depth. It's also a great quick fix on the bank so useful to have in your emergency kit should the need arise.
- Seal tip of fly line with either glue or flame.
- Use a piece of mono and put through braided loop. Push sleeve over loop just enough to expose seam join.
- Insert and push the line into hollow braid until it butts up against the braided loop.
- Holding the mono, pull/stroke the sleeve down the braid and over the fly line.
- Ensure you cover the braided loops open ends.
- Secure the sleeve with a dab of low viscose waterproof super glue. Too much glue and the braid will stiffen making it's ability to constrict under tension almost impossible.
- Or... replace sleeve and secure with mono nail knot as with fly line loop.
- Or... replace sleeve and secure with a whip finish using tying thread. (hi-vis coloured thread could assist as indicator when nymphing)
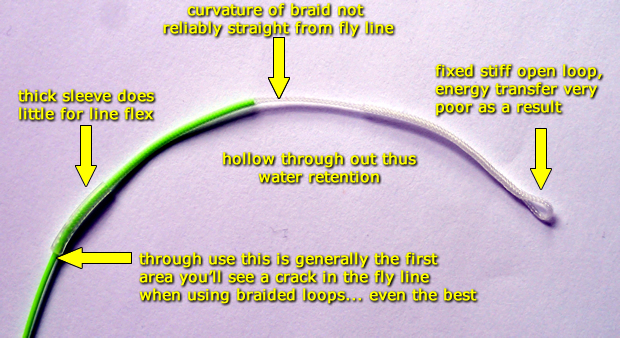
There are many braided loops available, they all strive to look the same all be it in a variety of colours... however, some are at best just awful in terms of construction, a few are mediocre by comparison, but in my opinion there is but one which ticks all the boxes and is without doubt the best on the market should you prefer this option. They are made for Roman Moser and are called Minicon.
The Braided Loop tutorial is with one of the Minicon leaders, below is some of why I avoid all else.
Make Your Own - If you'd like to have a go at making a twin walled braided leader loop a la' Roman Moser, here is a link to a pdf of a tutorial I did back in 2008 that'll help you out... the key is to get hold of thin gauge braid.
So that was an assortment of loop connections. What follows are the needle and nail knot types as an alternative. These connections can be extremely refined and I find are more synonymous with river anglers in the main.
| Nail knot (Braided & Mono Cores) - This can be a bankside quick fix as well as a more permanent option. You can with ease attach a full length tapered leader or just a small butt section with which to further adapt. Although rare, it has the potential to slip and strip the coating from a fly line leaving you with exposed core and little else, your terminal tackle is probably off down stream somewhere with the fish. If needs must and I use this application I'll ensure as with the fly line loop that the wrap turns don't touch so as to pinch 'on' and 'between' for a firm hold. |
|
This and other excellent fishing knot tutorials can be viewed at www.animatedknots.co.uk |

Although exterior to the fly line it is very efficient and doesn't suffer from hinging effects as long as the leader butt section is moderately stiff and is circa 55% or more of the diameter of the fly line tip itself. I have a preference for leaving a line tag and coating with UV knot sense to smoothen it out rather than cutting it flush as many prefer.
Needle Knot (Braided Cores) - This is probably as close as the leader can actually get to becoming almost 'at one' with the fly line itself. It's very strong and ultra efficient at transferring energy, obviously this is all relative to the make up of your remaining leader and the all important butt section that's needle knotted to the fly line.

Not too dissimilar to the nail knot it has the added advantage of having first been threaded through the hollow braided core of the fly line. Here I am applying a standard 9ft 5X tapered leader as an example.
 Using a C&F needle, I insert it into the fly line and out of the side at circa 10mm.
- I thread the tip part (thin end) of the tapered leader into the needle eye for about 1 inch.
- Now I pull the needle and leader tip back through and out of the fly line.
- I then remove the needle completely and pull the remainder of the leader by hand through the fly line all but circa 8 inches of the butt section so I can conclude with a nail knot.
- I tie a nail knot (See video) with touching turns this time and carefully tighten at the point where the needle exited the fly line.
- To finish I would then simply apply UV knot sense.
Knotless Leader Connection (Braided Cores)
 Follow the sequence above for the Needle Knot up to and including step 4...
- ... Then using abrasive paper lightly roughen the last 10mm of the butt section.
- Pull the remainder of this butt section through and into the fly line stopping at the roughened section.
- With just the roughened 10mm still exposed, apply a dab of super glue to this area then quickly pull this last bit into the fly line.
- You may need to trim a tag if still slightly exposed, if you're lucky you may have pulled it into the core in full.
I see little merit in this as an application other than for practising casting. From the outset it can only become weaker as a connection over time and is not something I'd be confident to use in any fishing situation.
Food For Thought
Loop Size - Take into consideration the loop size based on the stiffness of the materials you're dealing with. When looped to your leader it's efficiency is greatest if it closes as opposed to remaining open in an oval/tear drop shape.
Sleeves, Nail Knots and Whip Finishes - Keep these as small as possible in terms of length which ever is used. Apply only as much as is required to make it secure so keeping the stiffness in any part of the fly line to an absolute minimum.
The Sticky Stuff - I use a lot less super glue and more of the polyurethanes, UV knot sense and bug bonds to finish the knots and joints... I've learnt over time that these last much longer and give a more flexible and smoother finish.
 Essentials - The C&F Pipe/Needle, Mono for nail knots and UV Knot Sense are every day parts of my kit and hold the same importance as my floatant and snips... I tend to alter leaders and change flies more than any other aspect of my fishing so wouldn't want to be without them.
Finally - There's as much and half again the amount of methods possible to make loops and attach leaders, I hope you find above something that either works for or inspires you. If I've missed a wee bit of detail in the descriptions or images then my apologies... there's your challenge... fill in the gaps.
Detail for me is absolutely everything, there are a few personal tweaks I prefer to adapt, some of which are priceless but one thing is for sure, it takes as long to do this stuff well as it does to do it badly. It can be intricate and sometimes darn frustrating but would you have it any other way?... just take your time and enjoy!
Jim is our ESF in house fly casting contributor and AAPGAI Master level instructor teaching full time in the Cotswold, Wiltshire & Hampshire area... visit his website.
