Organza is my desert island fly tying material. If you've ever listened to Desert Island Discs on the radio you'll know that at the end of the programme the guest is asked to select just one of their eight chosen pieces of music to save from being washed away in the waves. If there was a similar choice to be made for fly tying materials, organza would be the one I would save. I've been experimenting with organza ribbon for several years now, exploring the use of this versatile material in flies for both fresh and salt water. I've described some of these flies in past issues of ESF, so I thought it would be timely to pass on the basics of tying with this material.
You should be able to find spools of the ribbon in craft shops like Hobbycraft where you'll find a wide selection of colours and widths to choose from. To check you have the right material look for nylon ribbon that has a thicker bunch of fibres running down either side. It's this weave that allows the ribbon to be cut lengthways and stripped to give the 'hackle' that is used in tying. If you can't find it in a craft store the same material is sold as a fly tying material called Pseudohackle, but it's much more expensive that way.
Organza can be combined with many other tying materials either as a principal or secondary component in fly design. Incorporating the material as a rib over dubbing or wound alongside a wire rib enhances segmentation and adds a subtle sparkle to fly bodies. While organza makes a great addition to other tying materials it can also be used on its own to make a huge variety of different imitative and attractor patterns. The APT all purpose terrestrial that I wrote about previously in ESF (issue 30) is a great fish catcher for trout and coarse species and uses just different shapes and sizes of cut organza ribbon to imitate a drowning insect.
Using organza for trout and other flies allows a great variety of body and thorax shapes, textures and colours to be achieved simply by varying the width and shape of the cut ribbon, and by using one, two or three strips of ribbon wound along the shank. Organza ribbon is available in a wide range of sizes; 30mm ribbon can be used to produce long fibres to wrap like hackles; 10mm or smaller ribbon can be cut down to 1-3mm and used like peacock or ostrich herl to wind bodies. A single colour wound in touching turns builds a body with subtle sparkle from the crimped fibres. Winding two or three colours together creates a great segmented effect when strongly contrasting colours like black and white are used, or a subtle blend using black, claret and tan or other mixtures.
Unlike natural herls and hackles, body shapes can be varied by cutting the organza straight or at an angle; straight cut material will give a straight body, cutting the ribbon at angle with yield a tapered body. In fact the permutations are endless, cutting the ribbon with a curve will produce a double tapered body for beetle patterns, cutting with pinking shears yields a rippled body shape. If you are tying with two strands in different colours you can introduce further variations by combining a narrow strip of ribbon wound in parallel with a contrasting longer strip; winding short trimmed orange ribbon with a longer stand of black gives a great translucent effect when wet. If you need further subtlety in coloration organza ribbon can be tinted with permanent marker pens. You can stroke the edge of ribbon with a marker pen prior to tying in or tint bodies after tying, the edge of the ribbon will color more strongly due to the higher thread density giving nice segmentation in pale colored bodies.
Preparing Organza for Tying
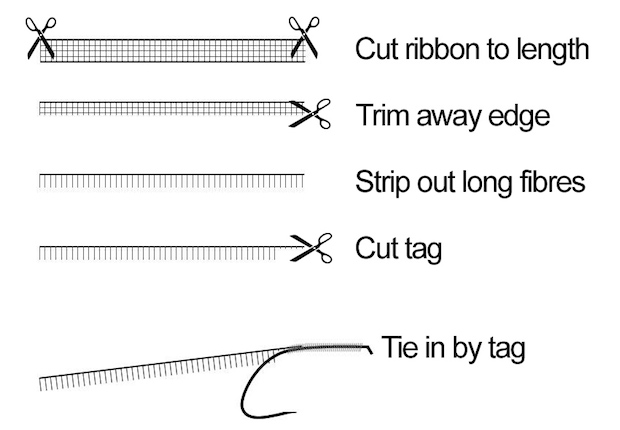
- Cut off a length of ribbon from the spool and then cut lengthwise to the width you need. Use a straight cut parallel to one edge for straight bodies, make an angled cut for tapered bodies.
- Strip out the long fibres from the cut strip; tensioning the strip between your fingers and using a dubbing needle will help when you get close to the edge. It should be fairly obvious when you've got all the loose strands out, but take care not to pick out the woven strands at the edge as this will weaken the ribbon and it won't tie in correctly.
- Create a tying in tag at one end by cutting away the short fibres close to the edge strip.
- When you start using organza you may find it helps to seal the ends of the cut strip in a flame to remove any chance of the edge fibres becoming loose as you wind on the material.
OJO Buzzer
A very simple pattern, but a very effective one. In the water the organza shimmers and gives a soft halo around the hook shank and I also believe that the texture gives trout a bit of 'crunch' when they take. I've experienced times when tentative takes on hard varnished buzzers have been converted to firm hook ups using this pattern. Fish this one on floating line with a long leader and a very (very) slow retrieve, or if there is a side wind, just cast out and let the line swing round. Takes are usually confident, though sometimes you'll get a double take; the end of the fly line twitches once or twice as the fish mouths the fly followed by a slow draw away and tightening of the line as the texture of the fly is pronounced edible. I usually carry a selection of OJO buzzers in different colors, sizes and hook weights to suit different conditions or the contrary nature of trout. I tie these patterns on barbless hooks which I now use for all my flies, I believe that barbless hooks are superior to de-barbed hooks as the points are specifically designed for the purpose and hold fish better when you want them to, and come out easier when you want them to; from fish or person.
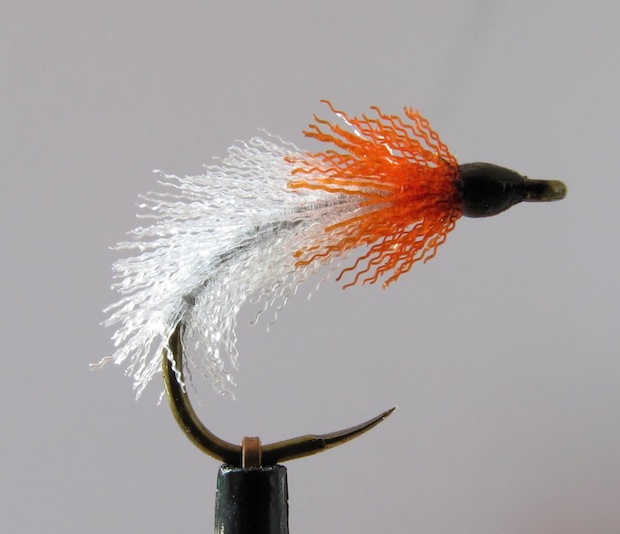
The white OJO buzzer with an orange thorax is a favourite. I’m sure the translucency of this pattern when wet is key to it’s success; the metal of the hook shank hints at darker internal organs while the white organza gives the impression of gills, trapped air and other characteristics of a rising/hatching buzzer.
Hook: TMC2499SP-BL size 10-16
Thread: Uni 8/0 white
Body: White organza ribbon
Thorax: Orange organza ribbon
- Catch in thread at eye and run back round bend in touching turns.
- Cut a 10 cm length of black organza ribbon and trim to 2-5mm width depending on the hook size and the bushiness of body desired and prepare for tying.
- Take the thread around the hook bend and tie in the tag end with the organza trailing behind the hook with the fibres pointing down. Run the thread back to 5mm from the eye.
- Spiral the organza forward in touching turns making sure not to trap the small fibres as you wind. Continue to wind forward in this fashion until 3-5mm from the eye, tie in the organza and cut off the excess.
- Tie in a short length of prepared orange organza trimmed and wind forward to just behind the eye. Tie off, trim away the excess, build a neat head and whip finish.
- Colour the head with a black permanent marker taking the colour into the base of the orange organza. Apply varnish or superglue to make a smooth glossy head.
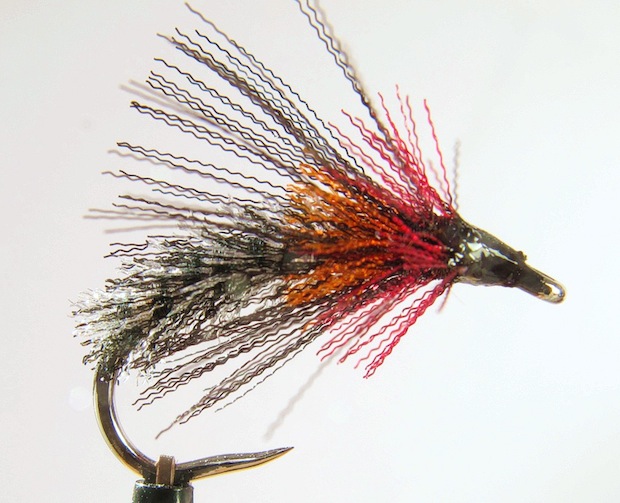
Bicolour OJO
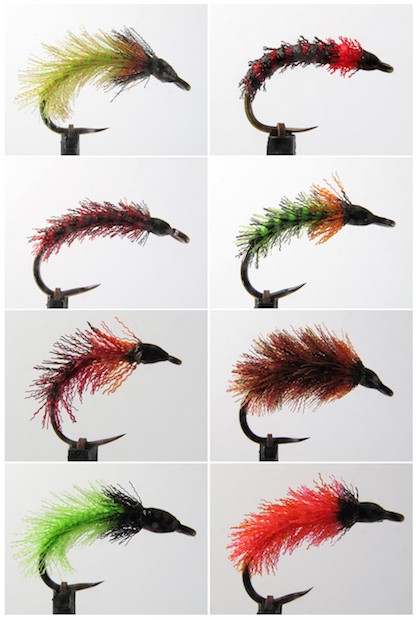
This pattern is slightly harder to tie than the single colored version, but the segmented effect produced by winding two strands of organza in parallel produces a great buggy effect which inspires confidence when fished. And as every experienced fly fisher knows, confidence can often be more important than exact pattern. Many variations are possible with this pattern to imitate different buzzers and nymphs and by varying the colors of the two colors used in the body, to extend the imitative range. Co-wrapping red and black organza and using red in place of orange at the thorax makes a great bloodworm pattern; using bright green and black wound together without a thorax yields a good caterpillar; mixing green and brown in the body with a brown or black thorax gives useful caddis patterns for both stillwater and river fishing.
Hook: Partridge Czech nymph size 12-18 or TMC2499SP-BL size 10-16
Thread: Uni 8/0 black
Body: Two strips of organza ribbon in contrasting colors
Thorax: Orange organza ribbon
- Catch in thread at eye and run back round bend in touching turns.
- Cut 10cm lengths of your chosen colours of organza ribbon and trim to 2-5mm width depending on the hook size and the bushiness of body desired and prepare for tying.
- Take the thread around the hook bend and tie in the organza strands trailing behind the hook with the fibres pointing down. Run the thread back to 5mm from the eye.
- Spiral the organza forward keeping the strands parallel and avoiding crossing the strands as you wind making sure not to trap the small fibres as you wind. Continue to wind forward in this fashion until 3-5mm from the eye, tie in the organza and cut off the excess.
- Tie in a short length of trimmed orange organza and wind forward to just behind the eye. Tie off, trim away the excess, build a neat head and whip finish.
- Colour the head with a black permanent marker blending the colour into the base of the orange organza. Apply varnish or superglue to make a smooth glossy head
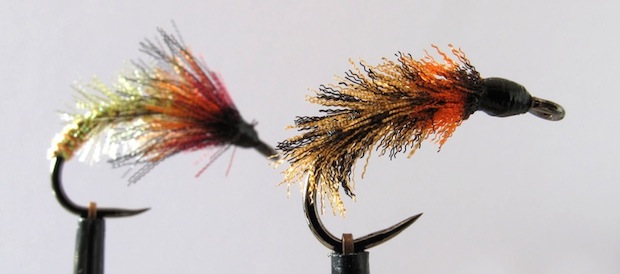
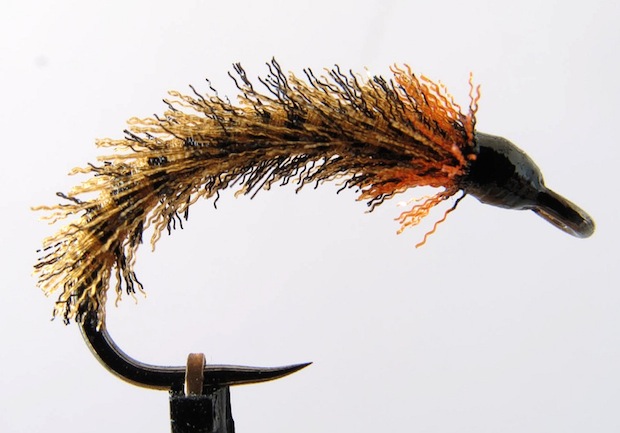
OJO Cruncher
Like standard cruncher patterns the OJO cruncher adds hackles to a buzzer pattern to simulate a hatching insect. Cutting and stripping wide organza ribbons yields long mobile fibers which can be wound exactly like conventional hackles. This pattern uses three organza hackles to build blended colors at the head; cutting the fibers of the three strips of ribbon to different lengths allows the colors to intermingle and create the impression of bursting wing buds and unfolding legs.
Hook: Partridge Czech nymph size 12-18
Thread: Uni 8/0 black
Body: Two strips of organza ribbon in contrasting colors trimmed short
Thorax: Orange organza trimmed medium
Wing 1: Black organza trimmed long
Wing 2: Claret organza trimmed medium
- Catch in thread at eye and run back to bend in touching turns.
- Cut 10cm lengths of your chosen colours of organza ribbon and trim to 2-5mm width depending on the hook size and the bushiness of body desired and prepare for tying.
- Take the thread around the hook bend and tie in the organza strands trailing behind the hook with the fibres pointing down. Run the thread back to 5mm from the eye.
- Spiral the organza forward keeping the strands parallel and avoiding crossing the strands as you wind making sure not to trap the small fibres as you wind. Continue to wind forward in this fashion until 3-5mm from the eye, tie in the organza and cut off the excess.
- Tie in a length of orange organza trimmed to 8-10mm and wind forward for two turns, tie in and trim excess.
- Tie in a strip of black organza trimmed to 10-15mm, wind two turns, tie in and trim excess.
- Tie in a strip of claret organza trimmed to 8-10mm wind two turns, tie in and trim excess.
- Build a neat head and whip finish. Color the head with a black permanent marker taking the colour into the base of the claret and orange organza. Apply varnish or superglue to make a smooth glossy head.
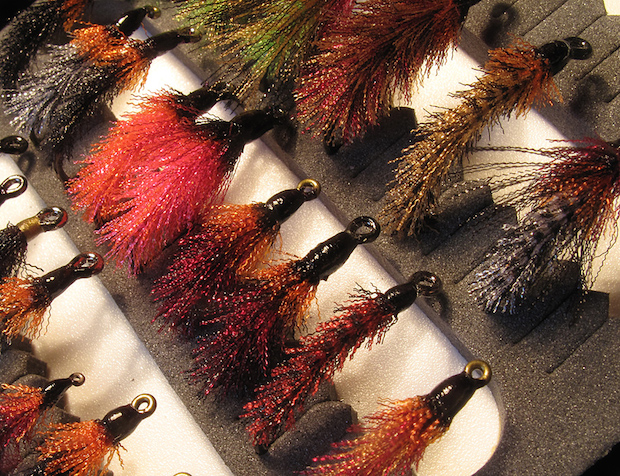
These OJO patterns only hint at the variations that can be achieved by tying flies with just a few cut strands of ribbon. With a bit of thought and the right size and shape of hooks you can make very close imitations of buzzers, nymphs, emergers and other trout food. You can also venture into the dark side if you want; co-winding long strands of pink and orange organza makes a very effective blob to keep in that emergency corner of your fly box.
Nick Thomas lives in South Wales. He started fly fishing on Scottish hill lochs many years ago and continues to design tie and fish flies for trout, carp, bass and anything else that’s going.