Nick Thomas gives his unique slant on a classic fly, the Shipman's buzzer.
“There are only a few notes. Just variations on a theme.” - John Lennon
Sometimes I like to develop new flies from scratch for a specific fishing situation and at other times I'll modify a classic pattern to suit my needs. The Shipman's buzzer was developed in the 1970s by Dave Shipman as a midge pupa imitation for surface feeding trout on Rutland Water. The original fly was tied with a red dubbed body with Antron fibre breathers to be fished damp sitting in the surface film. Many different variations of this tried and tested fly are described in fly tying books, generally with a seals fur body ribbed with wire or tinsel and with breathers made from CDC, Antron or other synthetic fibres or in some cases from plastic foam. Although this is primarily a stillwater pattern it can work well on rivers, especially on slow calm glides and pools when there’s a midge hatch.
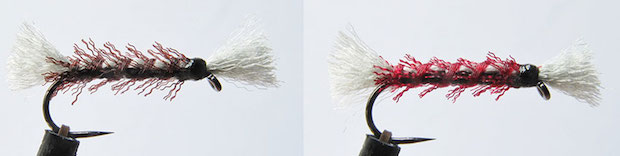
The first variation on the classic theme uses Tiemco Aero Dry Wing for the breathers and upper body with a rib of trimmed organza ribbon. When tied this way the rib segments the body with the organza fibres and the exposed paler body giving the impression of a swelling and bursting pupa shortly before hatching. Tied with a black or claret rib the fly will imitate buzzers hatching at the surface film, or you can use olive or tan organza to imitate other types of hatching pupae. Pale versions of the fly in grey or light tan or olive are also effective imitations of discarded pupal shucks which are often a key target of fish during or after a hatch on lakes. Light colours of both organza and Aero Wing can be tinted with permanent marker pens, so it's easy to experiment with different colour combinations for the body.
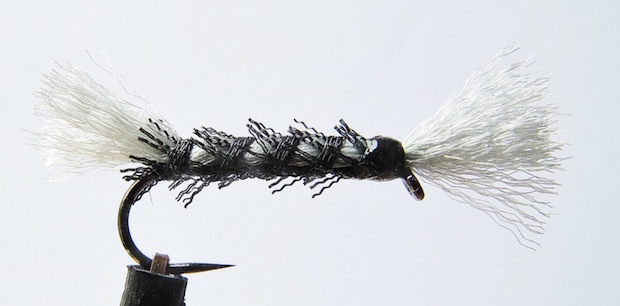
Hook: Dry fly, size 12 to 16
Thread: Veevus 10/0, black or white
Breathers: Tiemco Aero Dry Wing, grey or white
Rib: Trimmed and stripped organza ribbon in colour of choice
- Run on the thread at the eye and take back to the bend in touching turns.
- Cut a thin strip from the edge of a 10 cm length of organza ribbon, strip out the long fibres and tie in at the bend with the organza hanging behind the bend and with the short fibres pointing down.
- Cut a length of Aero Wing fibres about twice the shank length, lay it along the shank with equal parts overhanging the bend and eye and catch in with a couple of tight thread wraps at the bend.
- Lift the forward part of the fibres and take a couple of tight thread wraps around the shank immediately in front of the fibres to lock everything in place and then take the thread forward to the eye in touching turns to make a smooth body.
- Pull the Aero Wing fibres forward along the top of the shank and tie in behind the eye.
- Wrap the organza over the Aero Wing in open turns towards the eye pulling the organza tight to compress the Aero Wing fibres.
- Tie in the organza behind the eye and trim off the excess. Pull the breather fibres taught and trim to length. It can be useful to have a few versions tied with some of the rear fibres left a bit long and ragged to imitate the shuck of an emerging buzzer – sometimes it makes the difference to the fish.
- Build a small neat head, whip finish and varnish.
The second variant, which is tied totally with organza ribbon, started as an exercise in fly design to see if I could build a Shipman’s made from a single material and ended up staying in my fly box as a successful pattern. When it’s in the water the folded organza shimmers and gives a good imitation of the expanding gasses and unfolding wings inherent in the mechanics of the insect hatching process. It also looks a bit different from a standard Shipman’s, which is no bad thing on waters where the trout can see a lot of the standard model on calm spring and summer days.
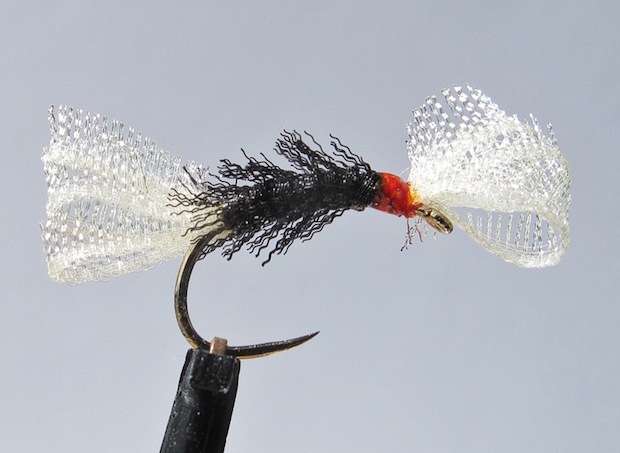
Hook: Lightweight curved grub or Czech nymph, size 14 or 16
Thread: Veevus 10/0 white
Breathers/Wings: White, cream or grey organza ribbon
Body: Organza ribbon in colour of choice
- Run on tying thread behind eye and take down to bend.
- Cut a thin strip from the edge of a 10cm length of organza ribbon, strip out the long fibres and cut the strip into three equal lengths.
- Tie in the strips at the bend, fold around and catch in with a couple of loose thread wraps to form loops in the ribbon. Placing a dubbing needle inside the loops helps to orientate the strips and even their lengths. Once you have them arranged tie down the ends with tight thread wraps and trim off the excess ribbon.
- Take the thread back up to the eye, tie in three further lengths of organza and repeat the previous step to form loops at the head.
- Return the thread to the rear, tie in a single length of stripped coloured organza and wind forward in touching turns to form the body. Tie in the organza and trim away the excess.
- Colour a couple of inches of thread with a red marker pen and wind on the thread to form a small head. Apply a small amount of varnish or superglue to the thread by the hook and whip finish.
These are versatile flies which can be fished in a number of ways through a day to match trout feeding patterns. I’ve found on many occasions fishing lakes in the early morning in spring that when the light is low and buzzers are hatching as the air warms up the fish cruise just below the surface and take the emerging insects. Later when the sun is up the fish drop down and concentrate more on rising steeply up to take drowned emergers and discarded shucks from the previous hatch. Changing fly size and floatant treatment is key maintaining to success through the day allowing the same pattern to match both actively rising and emerging insects, crippled emergers and shucks.
I believe that when fishing these patterns that size and treatment with floatant to control the attitude of the fly are more important than colour. The fly is sitting in or just below the surface film and therefore from a trout’s point of view is mostly just a dark silhouette against the brighter sky; the difference in colour between an olive and a black version is probably minimal if any from the fish’s point of view. Often the key to getting consistent takes is the way you apply floatant; this controls the attitude of the fly and influences what you are imitating. Ginking both ends and the body will make the fly sit up on the surface like an insect preparing to emerge, no Gink and it will sit in or just below the surface. If the fish are really fussy and refuse a fly Ginked at both ends they may be taking shucks which hang at an angle to the surface. In this case only apply Gink to the rear breathers; that way you don't get the floatant on your tippet during casting and the fly will sit in the film without the tippet by the fly giving things away.
Nick Thomas lives in South Wales. He started fly fishing on Scottish hill lochs many years ago and continues to design, tie and fish flies for trout, carp, bass and anything else that’s going.