Nick Thomas adds a neat caddis pattern to his fly box
I’m finishing off this article on the 1st of March; St David’s day and two days before the start of the trout season on my home water. I was looking forward to putting away my grayling nymph box and using some of my favourite trout flies. However, there’s not much chance of that with a code red weather warning in place and the road outside the window disappearing under drifting powder snow.

So, I’m spending my time doing what I do when I can’t fish; writing about fishing, tying flies and editing video. This morning, after having braved the blizzard to go to the dentist, I was tying up some different patterns in anticipation of some spring weather and some trout. It should be soon; when I was on the river in a warmer spell a couple of days ago the birdsong and new plant growth were certainly pointing in that direction. But of course, as it’s the first day of metrological spring, it’s snowing. Hard.
I’ve been tying up a range of different flies while watching the snow whip past the window. For me fly patterns tend to fall into one of two categories. Flies to tie when you can go fishing and flies to tie when you can't go fishing. The first are patterns which are quick to tie and ideal for refilling the empty slots in a box in a hurry. The second are those to tie when the weather is chucking it down and the river is up and brown; something to take your time over while looking forward to the next trip out. Consequently, my fly boxes tend to have a mix of simple and more complex patterns which I know work pretty well equally.

Today I’ve been mostly tying caddis pupa. I often think that life is too short to tie legs on a caddis. There are lots of very complex patterns out there that would have you do so. I've never tied any of them. Pulling off single feather fibres to make little legs with tiny feet or tying in rubber legs one by one and then adding joints with a cauterizing tool is not for me. I don't have the visual acuity or the manual dexterity of a brain surgeon and if I did manage to tie one I was happy with, I don't think I could bear to chuck it in a river.

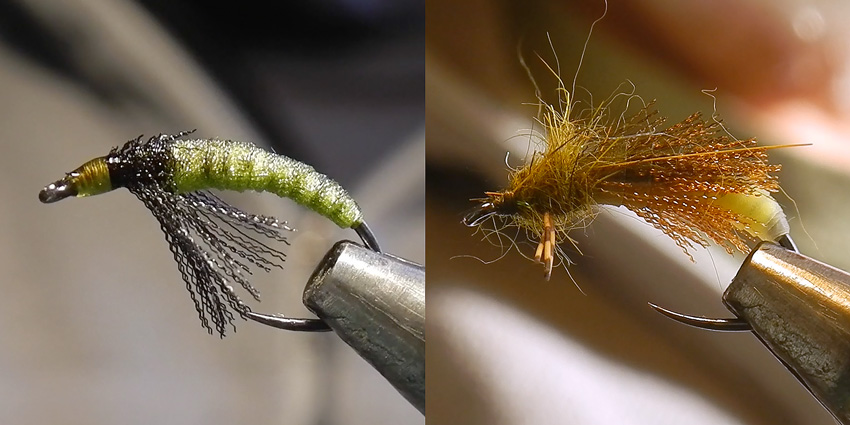
For me the simplest way to imitate a caddis pupa is a Czojo (see ESF #38 and picture above left). That pattern encapsulates all the essential features of the natural using just organza ribbon used in two different ways. For fishing fast snaggy water where the fish don’t get time to make a decision whether to eat it or not and you’re likely to lose a few flies, it’s hard to beat. For a more imitative pattern I’d recommend a Latex Organza Larva if you want something a bit more challenging to tie when you can't get on the river (see ESF #54 and the picture above right). The LOL does have the regulation three pairs of legs, so it’s a bit more complex to tie than the Czojo. I’ve done tying videos for both, so you can check them out on my YouTube channel.
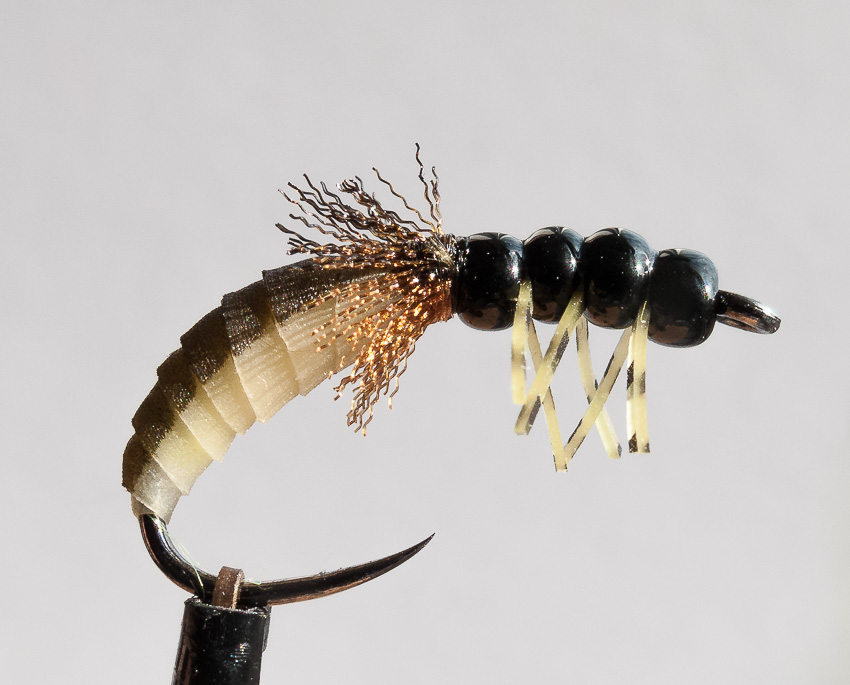
Last year around the same time I was tying up some pupae with a nymph skin abdomen, a dubbing thorax and a black glass bead for a head. It occurred to be that I could use several beads to form a thorax with a pair of legs between each bead. Rubber or silicone legs could be knotted and trapped between the beads and stick out from each joint of the segmented thorax. This would avoid the tedious task of tying in legs individualy and the fiddly job of winding dubbing or another material between the legs without trapping any of the little limbs. The resulting pattern did very well for me last season and I’m confident it will do the same this year. Once the snow has gone, anyway.

Hook Hends BL554 size 8-10
Thread Veevus 12/0 olive
Underbody Floss
Abdomen Translucent Nymph Skin and stripped organza ribbon
Thorax Glass embroidery beads
Legs Barred sili-legs
-
Thread four beads onto the hook, lock in the vice and place three beads at the back of the hook and one against the eye.
-
Make an over hand knot in a length of sili-leg, pass the loop over the hook and tighten the knot behind the first bead. Trim the ends of both legs to around 1cm as this makes the next steps easier.
-
Slide the second bead forwards and add a further pair of legs behind it.
-
Repeat with the third bead to add the final pair of legs.
-
Run on the tying thread behind the fourth bead and build up some turns of thread against the bead to compress all the beads and legs together, adjusting the positions of the legs as required.
-
Take the thread around the bend. Cut the end of a length of nymph skin at a 45-degree angle and catch in by the point.
-
Take the thread back up to the beads and catch in a length of floss. Wind a smooth body down to the nymph skin and back up creating an abdomen tapered at both ends. Tie in the floss and trim off the excess.
-
Wind the nymph skin forward in overlapping turns, applying tension at first and then slackening off to create a segmented tapered body.
-
Apply tension again as the turns approach the thorax to taper the body and tie in leaving a small gap before the beads. Pull the nymph skin up, cut under tension and secure with tight thread warps.
-
Cut a length of organza ribbon 2-3mm wide and strip out the long fibres. Tie in between the abdomen and thorax and make a few turns. Tie in and trim off the excess. Smear the thread with superglue and whip finish behind the beads.
-
Make final adjustments to the legs and cut to their final length. Apply a light coat of superglue along the top and sides of the beads to lock the beads and legs in position.
If you want an easy way to give your caddis pupae some legs you can watch me tying one below.
Nick Thomas lives in South Wales. He started fly fishing on Scottish hill lochs many years ago and continues to design, tie and fish flies for trout, grayling, carp, bass and anything else that’s going.